

Planning for a John Muir Trail (JMT) hike is quite involved. I’ve already covered the initial planning steps in Part 1 and Part 2. Part 1 covers the general overview of planning for a JMT hike. Part 2 focused on the logistics; permits, itinerary, and travel. The major portion of what is left is JMT food planning and resupply. As I had decided to both hike northbound and not to leave the trail to resupply – our first resupply point would be at Muir Trail Ranch, over 100 miles from our starting point. Food is, of course, a critical aspect of planning, and ensuring that we not only have enough food, but had enough calories would be critical. On top of this ensuring that they could fit into a bear canister was an added challenge.
Ensuring that we had the resupply at Muir Trail Ranch was an added logistical headache that needed a little more advanced planning as it had to be shipped at least 3 weeks before our arrival.
Food menus
From experience, I know that when we do a hard day of hiking we burn around 4000 calories. Generally, we won’t be able to pack 4000 calories meals but we need to ensure we maximize calories so we are not running too much of a deficit (although I can afford to lose a few pounds – not sure that Keenan can).
The basics of a menu are really pretty simple:
- Breakfast: Drink + Breakfast Cereal
- Snacks: Bars, Candy, Trail Mix
- Lunch: Tortilla + Tune or Chicken, Tacos
- Dinner: Drink + Main Meal + Dessert
We’ve done plenty of backpacking so putting the basic menu together was pretty easy. I started off with a very basic plan.
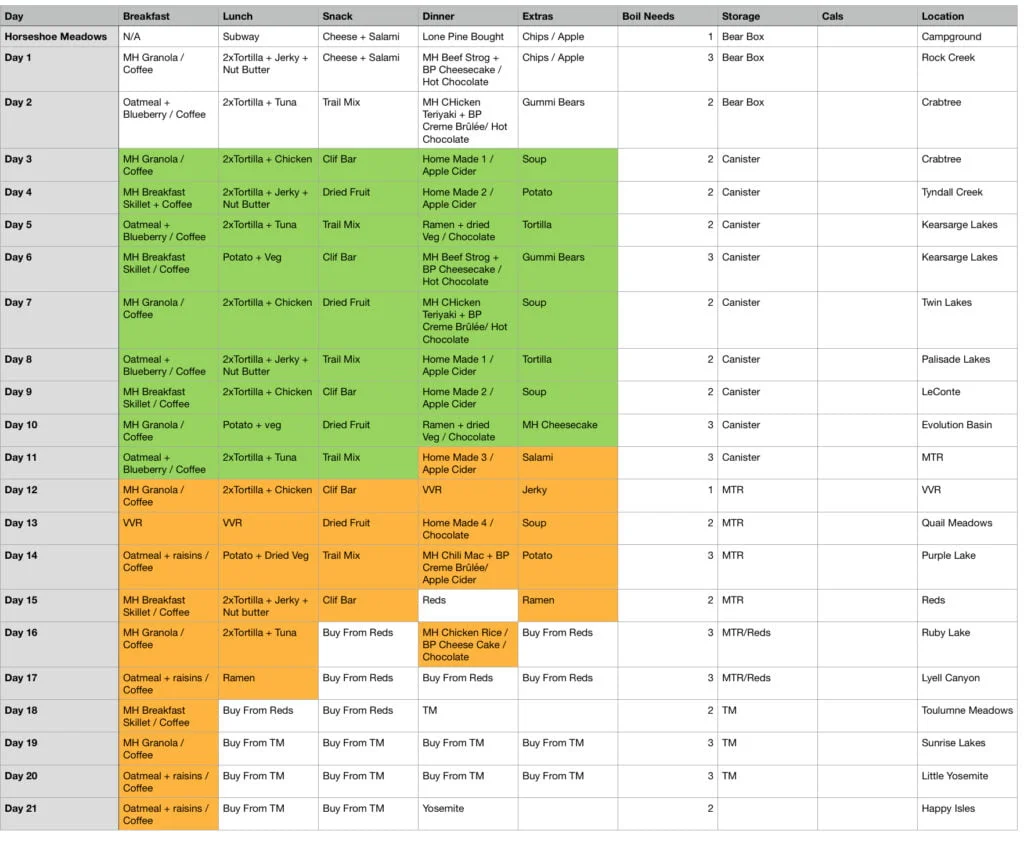
The green items have to go into the bear canisters. The orange items have to go in the resupply bucket. A couple of points worth noting:
- There are bear boxes at several location along the JMT. These allow you to store items that don’t fit into the bear canister and are particularly useful at the start of the journey. For a list of the bear boxes along the JMT see here. Of course this means that you have to camp at these locations so that you can utilize the bear box. For us this did not look like a problem – there are bear boxes at Rock Creak and Crabtree Meadows which aligned perfectly with the first few days of our journey. This means we could carry a few days extra food outside of the bear canister.
- From Vermilion Valley Resort there are many more option to buy food – at VVR, Red’s Meadow and Tuolumne Meadows. This means that if you are willing to add a little cost, it’s not necessary to carry as much food in the second half of the trip. The stores at these places all have pretty decent options for backpacker food. I decided not to go for a full resupply, and use the stores as part of our food strategy – in addition to being able to eat full meals at each of them.
Homemade versus store bought food
This is one of the great debates around food. Do you dehydrate your own or prepare your own means at home or do you rely on commercial brands like Mountain House and Backpackers Pantry? There is no doubt that the commercial brands are a safe way to go but they also get fairly expensive. Very often they can cost up to $10 for a meal for two. The cost for a homemade meal can be a 1/10 of that. I decided that I’d go with half commercial and half homemade meals. If you haven’t had experience making your own meals here are a couple of great books to get you going:
- The Hungry Spork Trail Recipes – Inga Aksamit
- Received for Adventure, Healthy, Hearty and homemade Backpacking Recipes – Glenn Mcallister
These have both great recipes and many tips on dehydrating your own food and how to increase the calorie count of meals. I’d highly recommend trying these at home so you can work out what you like before taking them into the trail.
To help with building my own foods I bought a package of dehydrated food – as I don’t have a dehydrator.
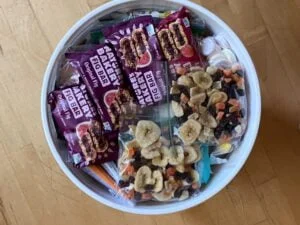
Snacks and adding calories and other food
Snacks are a critical part of the backpacking cuisine. These are a great way of easily getting calories as you hike. There are various easy techniques:
- Bars: Clif Bars, Fig Newton, etc
- Fruit & Nuts: Trail Mix, Dried Fruit, Almonds – you can often buy these in bulk at supermarkets
- Candy: Gummi Bears, Jelly Beans
Increasing the calorific value of food is important and easily achieved by adding a couple of key ingredients. Olive Oil is very high in calories. It’s available in sachets or can be transported in a small bottle. Powdered cheese and butter are also very easy to add to recipes and add calories.
I also like to take some small extra meals to fill in any special hunger gaps that I might have. Usually, I’ll take some extra dried potatoes and ramen.
Dessert and Drinks
Finally, dessert and drinks round out the menu. There are commercially available desserts but these are basically similar to quick set puddings that you can buy at the supermarket. They are usually made with milk – but as a backpacking substitute add Nido (indeed Nido can also be added to a range of foods to add calories).
Some drinks seem mandatory – coffee. And there are various pre-made coffees that contain coffee, cream, and sugar. Of course, in addition to coffee, hot chocolate and apple cider are great staples.
For drinks – remember to bring electrolytes. There’s going to be a lot of sweating on this hike!
Making a calorie estimate
Getting a rough daily calorie estimate is important. Overall you want to be picking calorie-dense food to maximize the calorie/weight/space trade-off. You can take the calorie counting to the extreme – but I like to at least make a rough estimate. As an example:
| Breakfast: Coffee | 80 |
| Breakfast: MH Granola (with added Nido and dried fruit) | 400 |
| Lunch: Tacos (2 Street Tacos) | 150 |
| Lunch: Tuna (1 packer per person) | 80 |
| Snack: Trail Mix (1 cup) | 650 |
| Dinner: MH Beef Stroganoff | 280 |
| Dinner: Pudding (with added Nido) | 340 |
| Dinner: Hot Chocolate | 160 |
As a basic rule of thumb for me – I start to feel comfortable when I am over 2000 calories (this isn’t going to work for everyone as I’m only 140lb). I use this as a conservative baseline and then will throw in one or two extra to bring the count closer to 2500 calories.
Repackage!
All this food has to fit into bear canisters. We have 2 BV500 and basically had to get 10 days of food into each. Most of the commercial food takes up way too much space in its original packaging. To optimize space repackage all the food ziplock bags. This saves a ton of space. I repacked all the following:
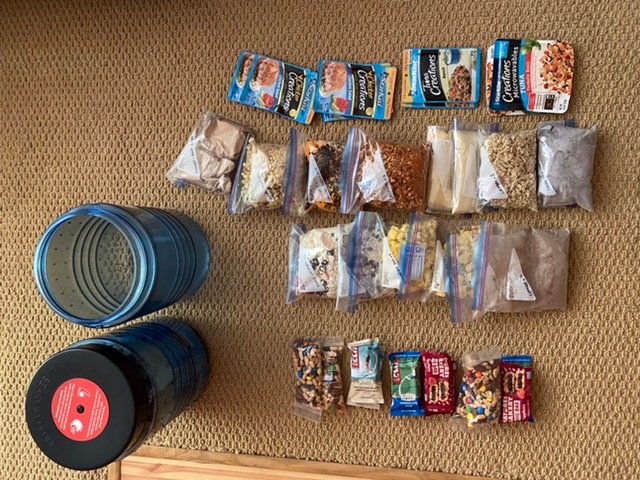
- All the Mountain House meals into ziplocks. I either put a single or two Mountain House meals into one ziplock. Cut out the cooking instructions and include the oxygen absorber. I also remove as much await from the ziplock as I can with a straw.
- Create drink ziplocks with the right quantities – so approximately 10 coffee/chocolate/apple cider in one bag.
- Repackage instant potatoes into a ziplock.
- Crush and repackage the ramen into it’s own ziplock as well. I also find crushing the ramen makes it easier to cook and eat.
- Create small ziplocks for a little extra Nido, cheese and butter powder.
When that’s all done – I law the entire menu out on a table and double-check that the menus line up with what I originally detailed. Sometimes it might take a few attempts to get the packing right – but we had no problems getting 10 days of food into the 2 bear canisters for 2 of us.
We also had a good safety buffer of 2 days of food that we were going to carry and store in bear lockers. So I wasn’t concerned that we wouldn’t have enough food to reach MTR!
The final steps
From a food perspective, the last task was to send the resupply bucket to Muir Trail Ranch. Their instructions are very explicit – by following their instructions you get a PDF that contagions all the label information to apply directly to the bucket. I got a food-grade, 5 gallons bucket from Home Depot and filled it with all our resupply food.
The resupply bucket needs to contain not just food, but any refills of consumables (sunscreen, toothpaste, medications) – possibly some replacement socks, and a great idea is to throw in some luxury items – we through in extra jelly beans – I’ve heard of people butting in a can of beer. Note that it’s really difficult to include fuel (lighters or canisters) and this is not necessary as MTR (and VVR / Reds / TM) all carry these.
With the bucket filled, labeled, and sealed we sent it off in the last week of June. Another sure sign that our hike is getting closer to becoming reality. MTR recommends using USPS Priority. This cost about $50 from Portland and the MTR cost is $85. As a guide, it only took 3 days for USPS to deliver to the local post office and a few days later I got confirmation from MTR that they had received the bucket.
Summary
Building a food menu is not that hard.
Make sure to have a good variety – don’t pack the same item for each day
Ensure you have a high enough calorie count – you’ll likely be burning more calories than you consume but you want to keep the deficit as small as you can.
Snacks are important – they keep you going through the day.

This is very helpful
I am planning a similar hike w/ first resupply at MTR around day 9. I was wondering about fuel. I notice that some days you boiled water 3x’s. How much fuel did you carry from Horseshoe meadows to MTR? Also, what was your strategy for recharging devices during that stretch. Thanks in advance
We took an 8oz and 4oz canisters. However we only used the 8oz. So for the two of an 8oz container lasted the entire trip. There were a couple of days where we had restaurant dinners (VVR. Reds and Yosemite). I a pretty quickly gave up on coffee for breakfast – we just found it more comfortable to get on the trail and snack. So it was mainly boiling water for dinner (as you point out sometimes 3x – once for rehydrating the main meal, hot drinks, and a little for clean-up and occasionally we’d have a hot lunch). Theoretically this should mean a 4oz can should get you to MTR/VVR.
Recharging was a bit of a pain – we both had about 20000mAh batteries – and both had iPhones and Apple Watches and a Garmin InReach. The inReach (mini) was the easiest – I generally just turned it on when I wanted to send a message – and did not need recharging at all in that stretch. For the rest it’s was really a case of conserve – low power mode / airplane mode / and turning off at night, as well as turning down the display brightness. For the iPhones we got about 2 days out of a charge and roughly 4 recharges – so starting with a full charge that gave us about 10 days(ish) – which was enough to get to MTR – but we were definitely running out of battery at that point – recharging the battery packs at MTR was super slow for some reason (we could have been in and out on an hour, but the recharge kept us there) – we ended up probably recharging to 50% and then completely recharging all the electronics at VVR.